Wednesday, August 29, 2012

Spelling Notebook

A (my 6 year old) is in 1st grade.  She now has daily and weekly homework, including spelling tests.  Because A is reading at a higher level her teacher sent home the 2nd grade sight word list to have her practice spelling them.  In 2nd grade they have to be able to read these words and spell them.  So I created a notebook for her to use at home to practice these sight words on her own time.  I didn't want it to be something she had to do, but rather something she could do when she wanted to (since she is in school all day).


Making great use of my label maker!

Inside (I did have to remind her how to use the lines on the page so that her words weren't so big!)

These are the different ways she can practice the words. There are numerous other ideas out there, these are just the ones I chose for her.

1st list of words-she chose to "hug" her words.


How this works:

Each day I taped a list to a page-I used the same list for one full week (or 5 days).  She practices the words each of the four different ways the first four days, and then on the 5th day she can choose her favorite way.  Then I left one page blank (without a list taped to it) so that I can test her on those words. 

This is an activity for grade school students and reinforces handwriting, reading, and spelling.


Pre-K Practice Sheets

L is now attending preschool 4 half days a week.  I have decided to make some practice sheets for him to do at home when he wants to do schoolwork.

Materials:

1) card stock
2) contact paper
3) wet or dry erase marker

Numbers and Number Words

Color Words

Lowercase Letters (o-z on back)

Uppercase Letters (O-Z on back)
First and Last name

Side note on the first and last name-I taught L how to write his name with all capital letters.  Which is fine, they are usually the easiest to form.  But the second he stepped into his new classroom his name was written with the capital "L" and the lowercase "andon".  I'm thinking I should have done this to begin with.  Also, his school has adopted the Handwriting Without Tears curriculum, which is okay because I taught him using Zaner Bloser handwriting, not D'Nealian.  I would suggest finding out which handwriting curriculum your student's future school uses and try to teach that.

Create your pages, print on card stock, cover with contact paper (or laminate them) and use a wet or dry erase marker to practice forming the letters, words, and name.
This activity reinforces letter and number formation, number word recognition, color word recognition, fine motor skills, and writing skills.  This is such an easy and cheap activity to make! My next thought is to punch holes in them and store in a 3-ring binder.  Then L will have a binder full of dry erase practice pages!

Other variations could be:

~ a page with shapes to trace (with the names)
~ a page with random dotted lines to trace
~ print any tracing page off your favorite website 

Once your student is reading:

~ sight words
~ family names
~ days of the week
~ months of the year
~ print any practice page off the internet (laminating reduces the wasted paper-although we have wasted our fair share of paper)

The possibilities are endless!  See my favorite websites for more ideas of pages to print and laminate!

By the way, all of my kiddos LOVE having their own activities and places to keep their activities.   When I make a new activity and we find a place for it I make sure to reinforce ownership of it (meaning they are to take care of it, use it correctly, and put it away correctly).

Do-a-Dot Color Recognition

N is working on recognizing her colors by:

1) picking the color I tell her to choose
2) picking a color and telling me which color it is

Such a cute student to have! :D

Picking her colors.

This is N painting "quietly".  She would dab the paint softly.

Dabbing her dot paint.  I had to show her how to hold the bottle correctly.  It takes talent to be able to take the lid off and turn the bottle upside down.


The finished product-not too bad for a 2 year old! And she stayed on the paper, too!

This activity reinforces fine motor skills, color recognition, and self-control!!  Keeping a 2 year old in one place to do an activity for at least 5 minutes can be challenging!  But I believe it is very important to have them practice at home before they enter the school setting (whether at home or in school).  Once they get into the classroom they will already have an understanding that they are there to learn/work and not just play.  Just my own opinion! :D

Cutting Straws

N (2yrs)  is concentrating on using her scissors and holding the straw in between the blades-2 very tedious tasks. 

The hardest thing for her was letting the blades open back up.  We have a pair of right-handed spring scissors.

I may have to invest in a pair of left-handed spring scissors because she kept switching hands and they won't cut that way.  

This is one of the easiest and simplest activities that really does help kiddos develop their fine motor skills! With the added bonus of seeing how far they can make the straw pieces fly!

Tuesday, May 8, 2012

Sorting and Counting

 This activity has several steps.  But it keeps L busy!
Materials:  Pom poms, dice, sorting cups, pickle tongs or tweezers of some kind.
I made this activity sheet and then made copies of it.  You can make one that fits your child's skill level. (I used my do-a-dot paints, a sharpie, and a straight edge to make this sheet.  You could probably make something on your computer, too.) 

L rolled the two dice and then put that number of pom poms into each cup.  He did this only once but you could have your child roll the dice more than that to get a larger number. 
Next he started filling out his chart.  Sort the colors in each cup.  Write the number in the correct box. 


Counting
I then had him add the two columns together.  Cup 1 + Cup 2 for each color.  Then I had him add all the  pom poms together 

There may be lots of steps to this activity, but they all keep L's mind busy.  I like to have some activities that are more involved.

You could also use beads instead of pom poms.

This activity reinforces counting, sorting, one-to-one correspondence, number formation, addition, and fine motor skills.

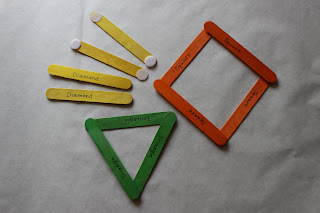
Popsicle Stick Shapes

 I've seen this activity floating around the internet in several forms.  Here is my take on the activity. 

Materials:  Velcro tabs and colored Popsicle sticks
Press the Velcro tabs onto the Popsicle sticks.  I made each shape a different color.  Write the name of the shape on each Popsicle stick.  Have your child put the Popsicle sticks together to make the shapes.

I only made three basic shapes.  A rectangle is doable, but might be difficult.  You could cut one Popsicle stick in half to make the shorter ends. 

You could also put Velcro tabs on several Popsicle sticks and just let your child build whatever he/she wants! 

This activity reinforces shape recognition and fine motor skills.

Wednesday, April 18, 2012

Letter Ring

My oldest daughter is in Kindergarten.  To help learn her sight words her teacher made up a stack of word cards, punched holes in them, and placed them on a loose leaf book ring.  My son and his friend like to flip through her cards, even though they can't read them.  So I made up a set of letter cards for each of them.  I used card stock, a hole punch, a paper cutter, and a loose leaf book ring.  You can find the rings in office supply stores.  Cut your paper into rectangles (or any shape of your choice-be creative!).  Punch a hole in the same place on each card.  Write your letters.  I chose to do capital and lower case.  You can do just the capital or just the lower case.  You could also type them up on the computer and print them out-but this took me less than 5 minutes to do!  Now L and his friend B each have a ring of letter cards to flip through!  This ring of letters can be use for many activities besides just flipping through them.

Other Letter Ring Activities:
~Flip to a letter and write that letter. 
~You (the parent) say a letter and have your child flip to it. 
~You (the parent) make a letter sound and see if your child can flip to the right letter.
~Laminate your cards and your child can trace the letters with a dry or wet erase marker.

Other Ring Card Activities:
~Use color paper to make color word cards (red paper with the word RED, yellow paper with the word YELLOW-you get the idea).  Your child will learn to recognize the color words!
~Number cards with the name of each number written underneath (write the number 1 and then spell the number o-n-e under it.  Your child will learn to recognize the names of the numbers as well!
~As your child progresses you can make sight word cards, too.
~Name cards with the names of each family member.  You could even make them larger and print off pictures of each family member and then write their name underneath.  Your child will begin to recognize everyone's name!  Kids love to find their name written somewhere!  L loves it when he finds the letter L or any other letter in his name!

BE CREATIVE!  HAVE FUN!  DO WHAT WORKS FOR YOU AND YOUR CHILD!

Magnetic Letters


We have a TON of magnetic letters!  Grab a cookie sheet and you are ready to begin!

L picked out the letters and put them in order.  Since we have so many, next time I will sort out one set of letters-it took him a while to dig through our stash. 
Magnetic Letter Preschool Activities:  Spell your first name, or other simple words like mom, dad, dog, cat, or non-sense words CVC words (consonant vowel consonant).  If you have a ton of magnetic letters like we do, have your child do a letter match on the cookie sheet. 

Magnetic Letter Kindergarten Activities:  Spell your first and last name, spell your siblings' names, spell your parents' names, or sight words (do an internet search for kindergarten sight words).  Take it a step further and after your child has spelled words with the magnetic letters have him or her write them on a sheet of paper.  Make a word, write a word. 

Magnetic Letter Toddler Activities:  Putting the letters on the cookie sheet works their fine motor skills.  As your child puts the letter on the sheet you (the parent) say the name of the letter and have them repeat it.  If he/she doesn't repeat it right away, that's okay!  The more your child hears the name of the letter, the more he or she will remember it!  Keep it fun!

Simple Skills Activity

Add caption
L worked on 4 skills today:  cutting, patterning, letter order, and letter formation.

1) L cut strips of paper into small squares ( I had drawn lines on the paper for him to cut).
2) L chose a patter of blue, yellow, green and laid it out on the floor.
3) L glued the squares into his workbook (I helped him make the frame).
4) Together we wrote the letters in ABC order and glued the card in the frame.  This particular activity helps with the order of things.  He writes one letter, I write the next letter, and then he has to figure out what comes next. 

Wednesday, March 28, 2012

Letter/Number Recognition Test


Type out a chart with all 26 letters (you choose if you want capital and/or lower case) and numbers-we did 1-10 for now.
Slip the chart into a protective sheet.  Have your child use a dry erase marker and circle letters and numbers as you give them.  

This is a simple way to test if your child recognizes all the letters and numbers.  You can keep track of the ones he/she doesn't recognize so you can work on those.  This can also be used for letter sounds when your child is ready.  Another way to involve your child in the test is to use a deck of flashcards.  Have him/her flip one over, say the letter and sound, and then cross it off of the chart. 

This activity reinforces letter and number recognition.

Addition Subtraction Card Game

A is filling in for L and doing an addition/subtraction game.
Materials:  Deck of cards (minus the face cards), dry erase marker, chart of numbers (as high as you want-mine is copied from a book I already had, but can easily be made in Word or handwritten), plastic sheet protector

Play:  Flip two cards over and add or subtract them.  Mark out the answer. 

Goal:  Mark off all the numbers before you run out of cards.

This activity can be adjusted for any age level.  Use as many numbers as you want and as many cards as you want.  Pull out the smaller numbers to use for a younger child. You can use only addition or only subtraction, or both, depending on what you are working on with  your child.  You can also have two players and use two different colors of dry erase markers or two different number charts.  Be the first to mark out all your numbers.  What if you have already marked out a number and get the same answer?  Be creative! Try subtracting for a different answer. Or place them back in the deck in different spots.  If you are playing with someone else when this happens, this could be your "lose a turn" or "skip a turn".

This activity reinforces counting, addition and subtraction skills, and number recognition.

Monday, March 5, 2012

Letter Match-Up

Using the letter tiles from a previous activity I spread them out for L to match up.  The task was to match the orange letter to the green letter.

After working for a few minutes L seemed overwhelmed with all the letter tiles. So we decided to separate them into two piles.  Now he could see all the orange letters and all the green letters.   
After matching up all the letters, you can take it a step further and have your child put them in ABC order.

Eventually I will make lower case letter tiles and have L match up his capital letters to the lower case letters.  

This activity reinforces letter recognition.  If you complete the last step it also reinforces ABC order.

Thursday, February 23, 2012

Letter Matching

For this activity I made a capital and lowercase letter chart in L's workbook:  3 columns and 9 rows.  In each box I wrote the letters in very small writing.  L will match up his letters from the stickers to the letters in the box. 

I also used my small stickers from a previous activity to write the letter sets.  I cut the sheet of stickers in half and used three halves for this activity.  This way he only had 9 letter sets at a time to work with (Aa-Ii, Jj-Rr, and Ss-Zz).

His dinosaur friend kept watch for him.

L working on matching his letters.  In the future I won't write the letters on the paper, but encourage him to figure out which letter comes next.  He still has to sing his ABC's a lot to figure out which letter comes next.  If working with his ABC's has taught him anything, it has at least taught him to say J-K-L-M-N-O-P (before those letters were unrecognizable).

All done!  He worked very hard on this and was proud of his work! 

Monday, February 20, 2012

Make Your Own Sorting Cups


My kids love to eat yogurt! Especially Bunny Yogurt (Trix)! So I decided to reuse them. After washing and drying the cups I took some fun duct tape and cut two inch strips. I placed the strips around the cup with the straight edges of the tape lining the top and bottom of the cups. Since my tape is a design, the polka-dots overlap. But they are still more fun to use!


The finished product! They are great for sorting activities, but L also likes to stack them and build castles!

Make Your Own Letter Tiles

Letter Tiles

Materials:

1) wooden nickels (from craft store)
2) mod podge (regular glue would work, but this dries super fast!)
3) two different colors of punch out letters (I had some on hand from my scrapbooking days, but you could also use letter stickers and skip the glueing-or just write the letters on the tiles)
4) spray acrylic sealer (not pictured)

I had all these materials on hand except for the wooden nickels.


To Make:

1) Glue the letters on using the mod podge
2) Let them dry and then brush over them again with mod podge
3) Let them dry and then spray a couple of coats of acrylic sealer on them (outside), allowing them to dry between each coat

There are many different activities that we will be doing using these letter tiles, so be watching for those. I also plan on making two other color sets so that we can play games with big sister.

Make Your Own CVC Blending Chart

CVC (Consonant Vowel Consonant) Blending Chart

Materials:
1) 3-ring binder
2) 3-hole puncher
3) cardstock (I didn't count how many sheets I used-sorry!)
4) paper cutter

To Make:
1) punch holes in both sides of the cardstock
2) cut the cardstock in half lengthwise
3) cut the cardstock to make 3 stacks


4) write all the consonants on the first stack of cards
5) write the vowels on the middle stack of cards
6) write all the consonants again on the third stack of cards


To Use:
1) pick a vowel and an ending consonant, then flip through all the consonant cards in the first stack as your child sounds out and blends the letters together (there will be lots of nonsense words, but some will real words)
2) change the vowels and consonants to make new blends

This tool will reinforce consonant and vowel recognition, letter sound recognition, blending, and reading.